Activities for Kids: Week 2

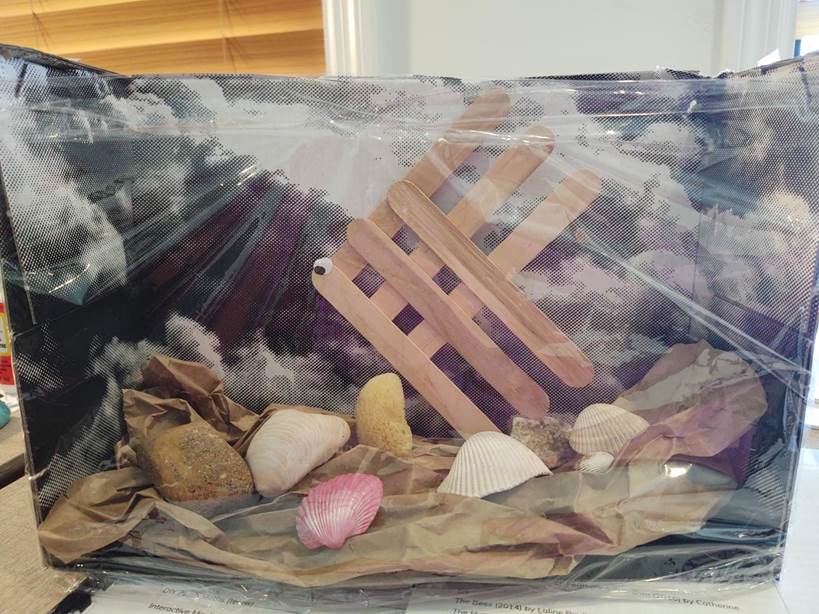
Aquarium with Angel fish

YOU WILL NEED:
- 1 shoebox
- Clear plastic wrap
- Brown lunch bag
- Craft (popsicle) sticks
- Googly eye, or small circle of white paper with black dot
- Seashells, rocks, old pieces of sponges, fuzzy pipe cleaners
- Glue
- Scissors
Angel fish:
- Place 3 popsicle sticks in a row with at least half an inch between them. Try to keep them straight and the spacing even.
- Place a drop of glue on each popsicle stick on one end. Line a popsicle stick up and place it down onto the glue. Your goal is to make a diamond grid pattern with the remaining popsicle sticks.
- Use a dot of glue to secure the eye.
- Allow to dry.
Aquarium:
- You will use the bottom only of a regular shoebox.
- Carefully cut one long side of the shoebox off. You will have 3 sides left, two short and one long. Face the box towards you, like a little stage.
- Next, take the brown lunch bag and crinkle/roll/twist. You may need to cut some off the length. This will make your “sandy” bottom.
- Third, use fuzzy pipe cleaners and cut, bend, shape at various lengths for seaweed and coral. Add rocks and shells to the bottom. Tear sponge in different sizes. Stand these up inside the paper bag crinkles.
- Prop angel fish up against the back of the shoebox. Glue or tape if needed.
- Tear off a piece of plastic wrap long enough to cover the front of the aquarium, and wrap around the sides. Tape in place. Done!
- You now have your very own AQUARIUM!
Investigate the World Like an Ocean Scientist!

Preparation:
Collect 10 everyday items such as spoons, gloves, pencils, soda cans, etc. If children with low vision would benefit from practice using their vision to collect data, put their objects in an open container, otherwise use a paper bag with only access for the hands.
Materials:
- Variety of items with varying sizes and textures, including a couple that make sounds
- Paper bag
- Equipment to record data, for example, electronic note takers, or Braillers, pens, and paper
Procedure
- Investigate and describe the items in your bag to another person using one-word descriptors, such as soft, bumpy, smooth, etc.
- Record the qualitative information.
- Once you’ve done this for each of the items in your bag, compare the items and the different words you used to describe them.
- Bonus: Have someone else investigate the items in your bag and try to describe them. Did you use the same words? Did you use different words?
Some descriptive adjectives:
Depth: deep, full, shallow, empty, endless, infinite, steep
Height: tall, short, small, vast, spacious, big, large, gigantic, tiny, huge, little, enormous, petite, miniature, massive, mammoth, mighty, microscopic, medium, colossal
Width: wide, thick, broad, narrow, thin, slender, skinny, slim, bulky, baggy, bulging
Weight: heavy, light, strong, feathery, fat, stocky, stout, lean, skinny, slim, slender, crowded, trim, lithe, plump, chunky
Shape: circular, curved, crooked, curly, diamond-shaped, flat, jagged, oval, pointed, round, rectangular, spiral, square, triangular, angular, arched, bell-shaped, bent, coiled, cone-shaped, conical, cylindrical, dome-shaped, egg-shaped, elliptical, erect, flat, flat, forked, geodesic, heart-shaped, hexagon-shaped, hollow, level, molded, oblong, obtuse, octagonal, pentagon-shaped, pyramidal, rambling, scalloped, straight, symmetrical, tunnel-shaped, upright, amoeba-like
Sounds: barking, crackling, crying, dripping, echoing, fluttering, giggling, hissing, howling, jingling, knocking, laughing, moaning, neighing, popping, quarreling, ringing, roaring, sizzling, swishing, tapping, thumping, whistling, yelling
Textures: blunt, brittle, coarse, crumbly, dense, flexible, fluffy, glossy, gritty, jagged, mushy, pebbly, prickly, tough, wrinkly, rocky, rough, scaly, shaggy, sharp, silky, slimy, smooth, soggy, spongy, springy, squishy, thorny, velvety
Adapted from Perkins School for the Blind: https://www.perkinselearning.org/accessible-science/activities/mystery-box-making-observations-and-collecting-data
Shark tooth necklace
Source: Shark Teeth Necklace - An Easy Shark Themed Craft for Shark Week (kidsactivitiesblog.com)

Supplies:
- Yarn
- White foam paper
- Scissors
- Hole punch
- Additional decoration such as beads, shells, or dyed pasta
Steps:
- Choose how long you would like your necklace to be by measuring string around your neck and deciding on placement.
- Cut out large triangles from foam paper to use as shark teeth. They should be large enough to fit two punch holes later.
- Feel for the flat edge of the triangle and make two hole punches with near the two opposite corners.
- Take your string and begin pulling it through each hole of the shark teeth. Now is the time to add any additional decoration such as beads or even dyed pasta.
- Once your desired number of shark teeth are on the string, tie the two ends of the yarn together to complete your necklace!


